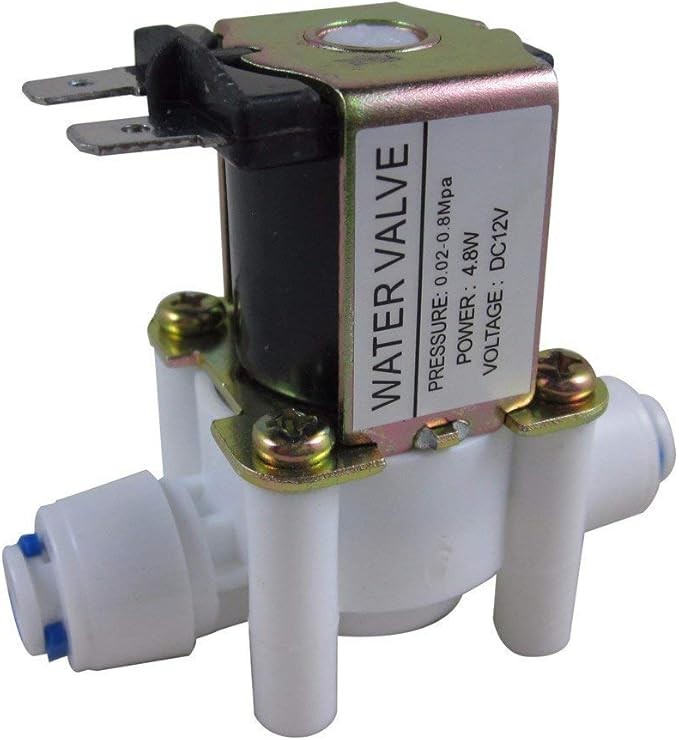
Important: Do Not Connect the Valve Directly to an Arduino
A 12V solenoid valve requires considerably more current and voltage than an Arduino GPIO pin can provide. The valve should be powered from a suitable 12V DC power supply and switched using a relay or appropriately rated MOSFET.
Arduino + Relay Example
const int valveRelay = 7;

void setup() {
  pinMode(valveRelay, OUTPUT);

  // Start with valve switched off
  digitalWrite(valveRelay, LOW);
}

void loop() {

  // Open valve
  digitalWrite(valveRelay, HIGH);
  delay(5000);

  // Close valve
  digitalWrite(valveRelay, LOW);
  delay(5000);
}
Typical Arduino Relay Wiring
Arduino 5V     -> Relay VCC
Arduino GND    -> Relay GND
Arduino Pin 7  -> Relay IN

12V Supply +   -> Relay COM
Relay NO       -> Solenoid Valve +
Solenoid -     -> 12V Supply -
With the valve connected through the relay's normally open (NO) contact, the valve remains unpowered and closed until the relay is activated.
How the Normally Closed Valve Works
12V OFF -> Valve CLOSED -> Water Stopped

12V ON  -> Valve OPEN   -> Water Flowing
Normally closed operation is particularly useful for water control systems because the valve automatically returns to its closed state if electrical power is lost.
Automatic Water Level Control Example
The valve can be combined with a water level sensor to automatically refill a tank or reservoir. When the controller detects a low water level, it can energise the valve to begin filling and switch it off once the required level has been reached.
const int levelSensor = 2;
const int valveRelay = 7;

void setup() {
  pinMode(levelSensor, INPUT);
  pinMode(valveRelay, OUTPUT);

  digitalWrite(valveRelay, LOW);
}

void loop() {

  int waterLevel = digitalRead(levelSensor);

  if (waterLevel == LOW) {
    // Low water level - open valve
    digitalWrite(valveRelay, HIGH);
  } else {
    // Water detected - close valve
    digitalWrite(valveRelay, LOW);
  }

  delay(250);
}
1/4″ Quick Connect Fittings
The integrated quick-connect fittings allow compatible 1/4-inch tubing to be pushed directly into the valve without conventional threaded plumbing fittings.
Ensure the tubing is cut cleanly and square before insertion. Push the tubing fully into the fitting and gently pull backwards to confirm that it has locked securely into position.
Common Applications
- Automatic water dispensing systems
- Water filtration and RO systems
- Automatic tank filling
- Plant and irrigation systems
- Hydroponics projects
- Water level control systems
- Arduino and ESP32 automation
- DIY beverage and liquid dispensing projects
- STEM and electronics projects
Important Usage Tips
Always use a power supply capable of providing the voltage and current required by the solenoid. Do not attempt to power a 12V valve directly from an Arduino or other microcontroller output.
If controlling the solenoid with a transistor or MOSFET rather than a relay module, a flyback diode should be installed across the solenoid coil. This protects the control electronics from the voltage spike generated when the magnetic field inside the solenoid collapses.
Before installing the valve permanently, confirm the required water pressure, flow direction, tubing size, and operating conditions are suitable for your application.





 Arduino Modules & Sensors
 Battery Compartments
 Component Cases
 Electronics Kits
 Microcontroller Boards
 Project Enclosures
 Shields & Hats
 Tablets
 Laptops
 Laptop Accessories
 CPU (Processor)
 CPU Coolers
 GPU (Graphics)
 HDD/ SSD (Storage)
 MOBO (Motherboard)
 PSU (Power Supply)
 RAM (Memory)
 Keyboard & Mouse Combo
 Keyboards
 Printers
 USB