Display Size
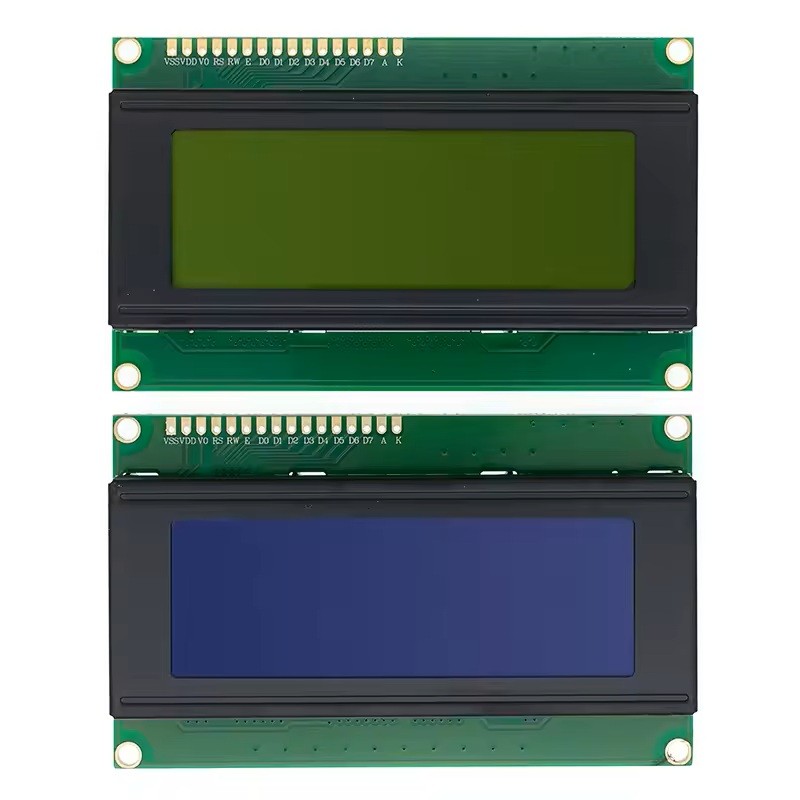
A 2004 LCD provides four lines of text with up to twenty characters on each line.
Line 1: 20 Characters
Line 2: 20 Characters
Line 3: 20 Characters
Line 4: 20 Characters
This gives a total of up to 80 visible character positions.
Typical HD44780 Pinout
A standard parallel-interface 2004 LCD commonly uses a 16-pin connector.
1  VSS  -> Ground
2  VDD  -> +5V
3  VO   -> Contrast
4  RS   -> Register Select
5  RW   -> Read / Write
6  E    -> Enable
7  D0   -> Data 0
8  D1   -> Data 1
9  D2   -> Data 2
10 D3   -> Data 3
11 D4   -> Data 4
12 D5   -> Data 5
13 D6   -> Data 6
14 D7   -> Data 7
15 A    -> Backlight Anode
16 K    -> Backlight Cathode
Always check the labels on your particular display before wiring it, as board layout and backlight arrangements can vary slightly.
4-Bit Mode
The HD44780 can be operated in either 8-bit or 4-bit parallel mode. Arduino projects commonly use 4-bit mode because it reduces the number of GPIO pins required.
Used in 4-Bit Mode:

RS
E
D4
D5
D6
D7

Plus:

VCC
GND
Contrast
Backlight
Data pins D0 to D3 are not required in 4-bit mode.
Arduino Wiring Example
LCD VSS -> Arduino GND
LCD VDD -> Arduino 5V

LCD VO  -> Centre pin of 10kΩ potentiometer

LCD RS  -> Arduino Pin 12
LCD RW  -> Arduino GND
LCD E   -> Arduino Pin 11

LCD D4  -> Arduino Pin 5
LCD D5  -> Arduino Pin 4
LCD D6  -> Arduino Pin 3
LCD D7  -> Arduino Pin 2

LCD A   -> Backlight Supply*
LCD K   -> GND*
*Check whether your particular module includes an onboard backlight resistor before connecting the LED backlight directly to the supply.
Contrast Adjustment
The VO pin controls LCD contrast. A 10kΩ potentiometer is commonly used.
Arduino 5V
    |
    |
10kΩ Potentiometer
    |
    +------ Centre Pin -> LCD VO
    |
    |
Arduino GND
If the screen powers on but no characters are visible, adjust the potentiometer slowly before assuming that the display is faulty.
Arduino LiquidCrystal Library
The standard Arduino LiquidCrystal library can be used with HD44780-compatible displays connected in parallel mode.
Basic Arduino Example
#include <LiquidCrystal.h>

LiquidCrystal lcd(12, 11, 5, 4, 3, 2);

void setup() {

  lcd.begin(20, 4);

  lcd.setCursor(0, 0);
  lcd.print("PcGuy Computers");

  lcd.setCursor(0, 1);
  lcd.print("HD44780 2004 LCD");

  lcd.setCursor(0, 2);
  lcd.print("Arduino Ready");

  lcd.setCursor(0, 3);
  lcd.print("20 x 4 Display");
}

void loop() {

}
Understanding setCursor()
The setCursor() function positions the next character using column and row coordinates.
lcd.setCursor(column, row);
Rows and columns start counting from zero.
First Character, Line 1:

lcd.setCursor(0, 0);

First Character, Line 2:

lcd.setCursor(0, 1);

First Character, Line 3:

lcd.setCursor(0, 2);

First Character, Line 4:

lcd.setCursor(0, 3);
Displaying Sensor Data
A 2004 LCD is well suited to projects where several sensor readings need to be displayed simultaneously.
lcd.setCursor(0, 0);
lcd.print("Temperature: ");
lcd.print(24.6);
lcd.print(" C");

lcd.setCursor(0, 1);
lcd.print("Humidity: ");
lcd.print(58);
lcd.print(" %");

lcd.setCursor(0, 2);
lcd.print("Voltage: ");
lcd.print(12.4);
lcd.print(" V");

lcd.setCursor(0, 3);
lcd.print("System: OK");
Example: Analogue Voltage Display
#include <LiquidCrystal.h>

LiquidCrystal lcd(12, 11, 5, 4, 3, 2);

const int voltagePin = A0;

void setup() {

  lcd.begin(20, 4);

  lcd.print("Voltage Monitor");
}

void loop() {

  int rawValue = analogRead(voltagePin);

  float voltage =
    rawValue * (5.0 / 1023.0);

  lcd.setCursor(0, 1);

  lcd.print("Voltage: ");
  lcd.print(voltage, 2);
  lcd.print(" V   ");

  delay(500);
}
Extra spaces after the displayed value help overwrite any leftover characters when a new value contains fewer digits than the previous one.
Clearing the Display
lcd.clear();
This removes all currently displayed characters and returns the cursor to the first position.
Avoid calling lcd.clear() continuously inside a fast loop, as repeated clearing can make the display appear to flicker. Updating only the required character positions usually produces a cleaner result.
Turning the Display On and Off
lcd.noDisplay();

delay(1000);

lcd.display();
These commands disable and restore the visible characters without deleting the information stored in the display memory.
Cursor and Blinking Cursor
lcd.cursor();
lcd.blink();
They can later be disabled using:
lcd.noCursor();
lcd.noBlink();
Scrolling Text
lcd.scrollDisplayLeft();

lcd.scrollDisplayRight();
These functions can be used for simple scrolling messages or user-interface effects.
Creating Custom Characters
HD44780-compatible displays allow a small number of custom character patterns to be stored in memory. These can be used to create icons, arrows, battery indicators and simple symbols.
byte heart[8] = {
  B00000,
  B01010,
  B11111,
  B11111,
  B01110,
  B00100,
  B00000,
  B00000
};

lcd.createChar(0, heart);

lcd.setCursor(0, 0);
lcd.write(byte(0));
Using an I²C Backpack
Many 2004 LCD displays are available with an I²C backpack attached to the rear of the module. The backpack converts the parallel LCD interface into I²C communication.
Without I2C:

Multiple GPIO Pins
       |
       v
HD44780 LCD


With I2C Backpack:

SDA
SCL
VCC
GND
 |
 v
HD44780 LCD
This can reduce the connection requirement to just four wires.
Typical Arduino I²C Wiring
I2C LCD VCC -> Arduino 5V
I2C LCD GND -> Arduino GND
I2C LCD SDA -> Arduino A4
I2C LCD SCL -> Arduino A5
On Arduino Uno and Nano boards, A4 and A5 are commonly used for SDA and SCL respectively.
I²C Arduino Example
If an I²C backpack is fitted, a compatible LiquidCrystal_I2C library can be used.
#include <Wire.h>
#include <LiquidCrystal_I2C.h>

LiquidCrystal_I2C lcd(0x27, 20, 4);

void setup() {

  lcd.init();
  lcd.backlight();

  lcd.setCursor(0, 0);
  lcd.print("PcGuy Computers");

  lcd.setCursor(0, 1);
  lcd.print("2004 LCD Ready");
}

void loop() {

}
The I²C address is commonly 0x27 or 0x3F, but it can vary. If the display does not respond, use an I²C scanner to determine the actual address.
Using the Display with ESP32
The display can also be used with an ESP32, especially when equipped with an I²C backpack. However, the ESP32 uses 3.3V GPIO logic while many HD44780 modules and I²C backpacks are designed around 5V operation.
Check the exact module and backpack configuration before connecting the I²C lines directly. Suitable level shifting may be required if the backpack pulls SDA and SCL up to 5V.
Common Applications
- Temperature and humidity displays
- Battery monitoring systems
- Solar monitoring projects
- Voltage and current displays
- DIY weather stations
- Menus and control panels
- Arduino projects
- ESP32 projects
- Robotics interfaces
- Home automation systems
- Data logging equipment
- Bench test equipment
2004 LCD vs 1602 LCD
1602 LCD:

16 Characters × 2 Rows
32 Character Positions


2004 LCD:

20 Characters × 4 Rows
80 Character Positions
The larger 2004 display is particularly useful when several values or system messages need to remain visible at the same time.
Troubleshooting a Blank Display
If the backlight operates but no text is visible, first check the contrast adjustment, power connections and LCD pinout.
Backlight ON but no text?

Check:

1. Contrast adjustment
2. VCC and GND
3. RS and Enable wiring
4. Data pin wiring
5. Code pin configuration
6. I2C address if using backpack
Important Usage Tips
Always confirm the physical pinout before applying power. Accidentally reversing VCC and GND can damage the display.
If using the LCD backlight directly, verify whether the module includes a built-in current-limiting resistor. Some modules may require an external resistor.
When using an I²C backpack, remember that both the I²C address and the backpack's internal pin mapping can vary between manufacturers. If one library configuration does not work, confirm the exact backpack type rather than assuming the LCD itself is faulty.



 Arduino Modules & Sensors
 Battery Compartments
 Component Cases
 Electronics Kits
 Microcontroller Boards
 Project Enclosures
 Shields & Hats
 Tablets
 Laptops
 Laptop Accessories
 CPU (Processor)
 CPU Coolers
 GPU (Graphics)
 HDD/ SSD (Storage)
 MOBO (Motherboard)
 PSU (Power Supply)
 RAM (Memory)
 Keyboard & Mouse Combo
 Keyboards
 Printers
 USB