How the E18-D80NK Works
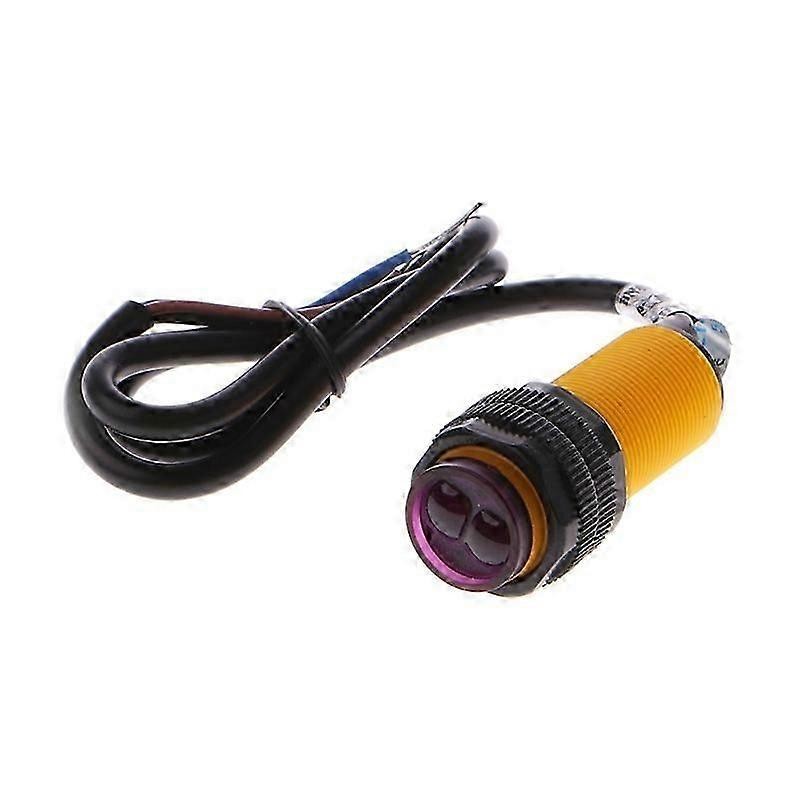
The sensor contains an infrared emitter and receiver. Infrared light is projected toward the area in front of the sensor, and when an object reflects sufficient infrared energy back toward the receiver, the internal electronics change the state of the output.
Infrared Emitter
       |
       v
   IR Light
       |
       v
     Object
       |
       v
Reflected IR Light
       |
       v
Infrared Receiver
       |
       v
Digital Output
Detection performance depends on several factors including the object's colour, surface finish, size, angle, ambient lighting, and the sensitivity adjustment of the sensor.
Typical Wire Connections
E18-D80NK sensors commonly use three wires for power, ground, and signal output. A common colour arrangement is shown below, but always verify the wiring supplied with your particular sensor before applying power.
Brown  -> VCC
Blue   -> GND
Black  -> Signal Output
Important: Output Type
Many E18-D80NK sensors use an NPN open-collector output. This means the sensor output effectively pulls the signal toward ground when activated rather than directly supplying a conventional HIGH output voltage.
A pull-up resistor or a microcontroller's internal pull-up can therefore be used when reading the sensor with an Arduino.
Arduino Input
      |
   Pull-Up
      |
      +------ Sensor Output
                 |
                 v
          NPN Output Stage
                 |
                 v
                GND
Arduino Wiring Example
E18-D80NK VCC    -> Suitable DC Supply
E18-D80NK GND    -> Arduino GND
E18-D80NK OUTPUT -> Arduino Digital Pin 2

Arduino GND and sensor supply GND
must share a common ground.
Check the operating-voltage specifications of your exact sensor before connecting it. E18-D80NK variants are commonly designed for a wider supply range than a standard Arduino GPIO voltage.
Arduino Example Code
const int sensorPin = 2;

void setup() {

  Serial.begin(9600);

  pinMode(sensorPin, INPUT_PULLUP);
}

void loop() {

  int sensorState = digitalRead(sensorPin);

  if (sensorState == LOW) {
    Serial.println("Object Detected");
  } else {
    Serial.println("No Object");
  }

  delay(100);
}
With a typical NPN open-collector version, a LOW signal indicates that an object has been detected. If your particular sensor behaves differently, confirm its output type and logic before modifying the program.
Example Serial Monitor Output
No Object
No Object
Object Detected
Object Detected
No Object
Adjusting the Detection Distance
The adjustment control on the sensor allows the detection sensitivity and approximate switching distance to be changed.
Position the object at the distance where you want detection to occur and slowly adjust the control until the sensor changes state reliably.
Sensor
  |
  |-------- Detection Area --------|
  |
  +------------------------------> Object

       Adjust sensitivity
       until reliable detection
After adjustment, test the sensor several times with the actual object that will be detected in your project.
Detection Range Is Not Exact Distance Measurement
The adjustable range should not be confused with a measured distance value. The E18-D80NK provides a switching signal rather than reporting that an object is, for example, exactly 20cm or 50cm away.
E18-D80NK:

Object Present -> YES / NO

Not:

Distance -> 42.7cm
If your project needs actual distance measurements, an ultrasonic, time-of-flight, or dedicated optical distance sensor may be more appropriate.
Example: Object Counter
The E18-D80NK can be positioned beside a conveyor or passageway to count objects as they move past the sensor.
Object -----> Object -----> Object
                 |
                 v
           E18-D80NK
                 |
                 v
              Arduino
                 |
                 v
              Counter
The program should count only the transition from no object to object detected rather than continuously increasing the counter while an object remains in front of the sensor.
const int sensorPin = 2;

int previousState = HIGH;
unsigned long objectCount = 0;

void setup() {

  Serial.begin(9600);

  pinMode(sensorPin, INPUT_PULLUP);
}

void loop() {

  int currentState = digitalRead(sensorPin);

  if (previousState == HIGH && currentState == LOW) {

    objectCount++;

    Serial.print("Object Count: ");
    Serial.println(objectCount);
  }

  previousState = currentState;

  delay(20);
}
Example: Automatic Relay Control
The sensor can also be used with an Arduino and relay module to activate equipment whenever an object is detected.
E18-D80NK
     |
     v
  Arduino
     |
     v
Relay Module
     |
     v
Light / Motor / Solenoid / Other Load
const int sensorPin = 2;
const int relayPin = 7;

void setup() {

  pinMode(sensorPin, INPUT_PULLUP);
  pinMode(relayPin, OUTPUT);

  digitalWrite(relayPin, LOW);
}

void loop() {

  if (digitalRead(sensorPin) == LOW) {

    digitalWrite(relayPin, HIGH);

  } else {

    digitalWrite(relayPin, LOW);
  }
}
Some relay modules use active-low inputs. If your relay operates in reverse, the HIGH and LOW relay states may need to be swapped.
Using the Sensor with ESP32
The E18-D80NK can also be interfaced with an ESP32, but particular care should be taken with signal voltage because ESP32 GPIO pins use 3.3V logic.
With an open-collector sensor output, the signal can be pulled up to the ESP32's 3.3V logic supply rather than to the sensor's higher supply voltage, provided the particular sensor output configuration is suitable.
Sensor Output
      |
      +------ ESP32 GPIO
      |
    Pull-Up
      |
     3.3V
Object Colour and Surface Can Affect Detection
Because the sensor relies on reflected infrared light, different materials may be detected at different distances.
Light / Reflective Surface
          |
          +---- Usually stronger reflection

Dark / Absorbent Surface
          |
          +---- May produce weaker reflection

Angled / Shiny Surface
          |
          +---- May reflect IR away from sensor
Always calibrate the sensor using the actual objects that will be detected rather than relying only on a theoretical maximum detection range.
Common Applications
- Robot obstacle detection
- Conveyor object detection
- Product counting systems
- Automatic doors and gates
- Parking and positioning projects
- Presence detection
- Automatic lighting
- Industrial automation experiments
- Security and alarm projects
- Arduino and ESP32 projects
- STEM and robotics projects
Installation Tips
Mount the sensor securely so that vibration does not change its direction or detection area. Position the front of the sensor toward the expected path of the object and then adjust the sensitivity while the system is installed in its normal operating position.
Avoid pointing the sensor directly toward strong infrared sources or intense sunlight where possible, as excessive ambient infrared light may affect detection reliability.
Important Usage Tips
Always confirm the supply voltage, wire identification, and output type of your exact E18-D80NK before connecting it to a microcontroller. Similar-looking sensors may be available with different electrical configurations.
When controlling motors, pumps, solenoids, or other higher-current equipment, use a suitable relay, MOSFET, motor driver, or other switching interface rather than attempting to power the load directly from the sensor or microcontroller GPIO.
For reliable automation, test the sensor with different examples of the object being detected and under the lighting conditions expected in the final installation.



 Arduino Modules & Sensors
 Battery Compartments
 Component Cases
 Electronics Kits
 Microcontroller Boards
 Project Enclosures
 Shields & Hats
 Tablets
 Laptops
 Laptop Accessories
 CPU (Processor)
 CPU Coolers
 GPU (Graphics)
 HDD/ SSD (Storage)
 MOBO (Motherboard)
 PSU (Power Supply)
 RAM (Memory)
 Keyboard & Mouse Combo
 Keyboards
 Printers
 USB